How to take care of your skin while using diabetes devices
What are diabetes devices?
Diabetes devices are pieces of technology that help people to manage the condition, like an insulin pump or a glucose sensor (also known as a continuous glucose monitor). You might call them gadgets, but they’re so much more than that!
The use of wearable diabetes devices is becoming increasingly popular, as they offer many benefits to people living with diabetes.
Wearing a diabetes device often means having something small inserted into your skin like a cannula or filament, and part of the device may be kept in place on your body with an adhesive.
Diabetes devices are generally worn throughout the day and night, so it’s important to take extra care of your skin. This page contains information to help you do just that.
Considerations for wearing diabetes devices on your body
In this article we’ll look at:
- Selecting the right place on your body for your diabetes device
- Considerations if you’re wearing more than one diabetes device
- Preparing your skin when applying a diabetes device
- Tips for keeping the diabetes device in place
- Tips for avoiding skin irritation from a diabetes device
- Tips for removing your diabetes device
Site selection for diabetes devices
When you’re applying wearable devices, the first thing to do is to check the manufacturer’s guidance for recommended sites and specific application instructions.
Find out more about the recommended sites for Omnipod® Insulin Pod Therapy in our Pod Placement guide.
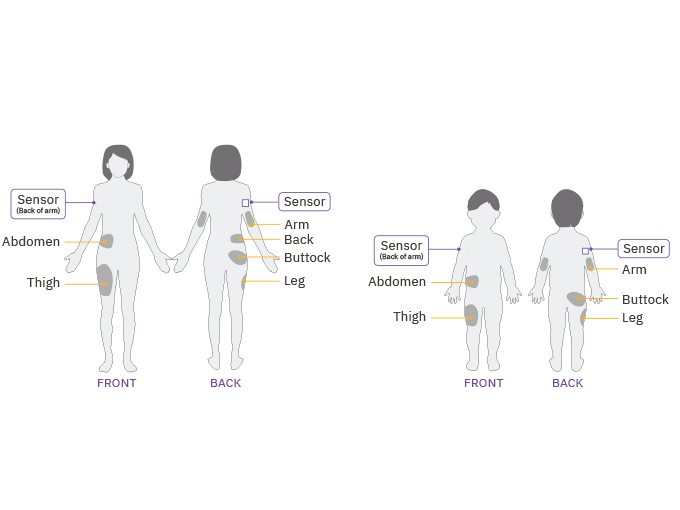
General tips for choosing a diabetes devices site
Change the device’s location each time you apply a new one, as using the same site repeatedly may affect insulin absorption1.
By making sure the new site is at least one inch away from the previous one, you’ll also reduce the chances of skin irritation2, so it’s best to not overlap with the last site.
Keep the device 5 centimeters away from your belly button and ideally not over a mole, tattoo or scar.
Avoid areas with an active infection.
Try to make sure you’re not putting the device anywhere uncomfortable, or in a place where you could dislodge it when you sit or move around, such as under folds of skin or directly under your waistband.
- Watch out for where you wear belts, handbags and backpacks too as these can knock the devices, causing irritation.
As you try your devices in different places, you’ll learn which sites feel the most comfortable and convenient for you.
Everyone has slightly different preferences, so the more you wear your devices, the more you’ll understand which of the recommended placements suit you and your body.
Tips if you’re wearing multiple diabetes devices
If you're wearing a Pod or insulin pump, you might wear it alongside another diabetes device, such as a glucose sensor.
Check the manufacturer’s recommendations for making sure these devices are not worn too close together.
In the case of hybrid closed loop systems, it may also be important to keep the devices in ‘line of sight’, to ensure the body is not blocking the signal between the two devices.
This means they can ‘see’ each other and communicate effectively.
Site preparation for diabetes devices
Before inserting a new diabetes device, clean your skin well. Avoid getting body lotion, creams or oils near the new site, as these products may loosen the adhesive.
Try to make sure you’re cool and dry (i.e. not sweating) when you’re changing the device.
To improve adhesion, use an alcohol wipe or soap and water to clean the area where you plan to place the new device. Let it air dry completely before applying.
Once the device has been applied, press down on the adhesive edges to help it stick to the skin.
Pushing down over the device adhesive will encourage the bonds to form with the skin.
In general, gently exfoliating the skin can help to remove dead skin cells, which may help the device to stay in place.
Remove hair on the site by shaving or trimming with scissors before application can ensure good skin contact with the adhesive. Try doing this the day before to reduce any irritation.
- If possible, avoid getting the device wet for at least two hours after applying it to help with adhesion. So don’t take a bath, shower or swim with a brand-new device.
There are products available to enhance adhesion if needed. We have included some options below, but it’s best to ask your healthcare team for more information.
Troubleshooting for common issues when applying diabetes devices
Issue: Oily Skin
- Problem: Residue from soap, lotion, shampoo or conditioner can prevent your device from sticking securely. Skin is naturally oily.
- Solution: Clean your site thoroughly with an alcohol wipe before applying your device, and be sure to let your skin air dry.
Issue: Damp Skin
- Problem: Dampness gets in the way of adhesion.
- Solution: Towel off and allow your site to air dry thoroughly. Do not blow on it.
Issue: Body Hair
- Problem: Body hair gets between your skin and your device. If there is a lot of it, it can prevent the device from sticking securely.
- Solution: Clip or shave the site with a razor to create a smooth surface for the device to stick to the skin. You may wish to do this up to 24 hours before applying the device to prevent irritation.
Tips for keeping the diabetes device in place
Adhesive Wipes and Creams
These creams, wipes and sprays provide a tacky layer between the device and the skin to help it stick.
You might need to try more than one option to work out which one suits your skin best.
There are various barrier creams available to help keep your devices in place throughout the length of wear. Speak to your healthcare team about options available to you.
Alternatively you can buy various adhesives online, or speak to a pharmacist. Some options include3:
- Skin Tac™ is a latex-free, hypo-allergenic ‘tacky’ skin wipe or liquid
- Skin Prep is a fast-drying sterile liquid or wipe that forms a skin-protectant film.
- Mastisol® is a liquid adhesive
Please note these product recommendations are not endorsed by Insulet. Availability may vary depending on your location.
Adhesive Tapes and Patches
There are lots of options for tape, as well as ‘patches’ that stick over the devices for an extra layer of protection or adhesion.
This might be particularly useful if you are extremely active, frequently swim or are prone to sweating.
The tape can be cut to size, and many patches are precut to fit the shape of each particular device, so you can buy the patches to match the device you are wearing.
Speak to your healthcare team for their recommendations, but some options include3:
- IV3000 film
- Blenderm™
- Hypafix®
- Kinesiology tape
- Opsite™
- Tegaderm HP tape
- Transpore™ Surgical Tape
Please note these product recommendations are not endorsed by Insulet. Availability may vary depending on your location.
Protecting the skin from irritation caused by diabetes devices like insulin pumps and glucose sensors
Some people experience reactions to their device or device adhesive, affecting the skin and causing irritation.
Human skin is an uneven surface that can stretch4. Skin cells are constantly renewing (the cycle is around every 28 days), as well as producing sweat, oil and hair at rates that vary between each person.
A report looking at chronic device use in diabetes cites these common complications from wearing diabetes devices3:
- Tissue damage and scarring
- Hypersensitivity
- Lipodystrophy (uneven distribution of fat)
- Infection
There are products available that act as a barrier between the skin and the device adhesive, which helps to limit the skin irritation.
For films or bandages, cut a small hole where the cannula or filament is to ensure it inserts properly3.
These product recommendations are not endorsed by Insulet. Availability may vary depending on your location.
- AllKare® Protective Barrier Wipe provides a barrier layer on skin to help protect against irritation and adhesive build-up.
- Bard® Protective Barrier Film provides a clear, dry, waterproof barrier for irritation associated with adhesives.
- Cavilon™ Durable Barrier Film is a waterproof, breathable skin protectant.
- Skin Prep is a fast-drying sterile liquid or wipe that forms a skin-protectant film.
If you experience skin irritation after applying any diabetes device, speak with your doctor, pharmacist or diabetes management team.
Gentle removal of diabetes devices
Loosen the edges of the adhesive with your fingernails first before pulling back slowly to remove the device.
The following products can also be used on the adhesive of the device to help with the removal. They may also help to reduce irritation after removal.
Following product use, clean the area with warm, soapy water and rinse well to remove the residue remaining on the skin3.
These product recommendations are not endorsed by Insulet. Availability may vary depending on your location.
- AllKare Adhesive Removal Wipe
- Detachol® Adhesive Remover
- Baby oil or baby oil gel
- Uni-solve Adhesive Remover
- Tac Away Adhesive Remover
There are lots of other people with diabetes you can speak to online - on social media, in forums and in groups, that may be able to offer their experience before you buy a spray, cream or tape.
Remember, you’re not alone, and there are other people you can talk to who understand what living with type 1 diabetes is like.
References and Disclaimers
2 https://diatribe.org/diabetes-technology/6-things-know-about-wearing-continuous-glucose-monitor
3 https://www.ncbi.nlm.nih.gov/pmc/articles/PMC6011799/
4 https://multimedia.3m.com/mws/media/876307O/skin-vs-stainless-steel-adhesion-testing-for-medical-design.pdf
Dexcom’s recommendations for sensor adhesion and irritation issues can be found here: https://www.dexcom.com/faqs/sensitive-skin
FreeStyle Libre 2 Skin Preparation before application: https://youtu.be/EjHrglTXzTw?si=YJHyBMO3E8ATtDnT
Omnipod 5 can be used with Dexcom G6, Dexcom G7 and the FreeStyle Libre 2 Plus Sensors. A compatible Pod is also needed.
These modules are not a replacement for medical advice or training. Please always speak to a qualified healthcare professional about your options.
The information and other content provided in this article, or in any linked materials, are not intended and should not be construed as medical advice, nor is the information a substitute for professional medical expertise or treatment. If you or any other person has a medical question or concern, you should consult with your healthcare provider. Never disregard professional medical advice or delay in seeking it because of something that have read on this blog or in any linked materials. If you think you may have a medical emergency, call your doctor or emergency services immediately. The opinions and views expressed on this blog and website have no relation to those of any academic, hospital, health practice or other institution.